Thursday, March 26, 2015
Nate Marcel: greatseamonster@gmail.com: Life Drawing Spring Term!
Nate Marcel: greatseamonster@gmail.com: Life Drawing Spring Term!: Just a few more days to enroll!
Friday, March 13, 2015
Wednesday, March 11, 2015
The Anatomical Mirror [feedly]
The Anatomical Mirror
http://streetanatomy.com/2015/03/11/the-anatomical-mirror/
-- via my feedly.com reader
http://streetanatomy.com/2015/03/11/the-anatomical-mirror/
-- via my feedly.com reader
The 'Analog Memory Desk' Has a Built-in Scrolling Paper Surface for Recording 1,100 Yards of Sketches and Ideas [feedly]
The ‘Analog Memory Desk’ Has a Built-in Scrolling Paper Surface for Recording 1,100 Yards of Sketches and Ideas
http://www.thisiscolossal.com/2015/03/the-analog-memory-desk/
-- via my feedly.com reader
http://www.thisiscolossal.com/2015/03/the-analog-memory-desk/
-- via my feedly.com reader
Tuesday, March 10, 2015
Sunday, March 8, 2015
Pose Refs by Zombiesmile [feedly]
----
Pose Refs by Zombiesmile
// How to Art
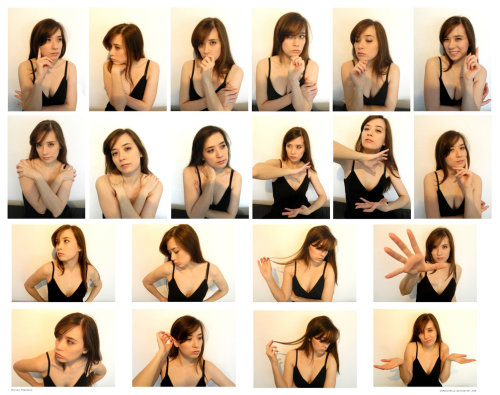

Pose Refs by Zombiesmile
----
Shared via my feedly reader
Sent from my iPad
Rembrandt Says Don’t Take It Slow [feedly]
----
Rembrandt Says Don't Take It Slow
// Artist Daily
How to Draw According to Rembrandt
Straight from the master's mouth, er, hand. Study Rembrandt's drawing techniques and you'll find short strokes and quick crosshatching that the artist used to get to the heart of every visual impression he wanted to depict.
 |
| The Three Trees by Rembrandt, 1643, etching with burin drypoint in black ink on cream laid paper, 8 x 11. |
But Rembrandt was not a quick sketcher just for the sake of speed. According to Rembrandt expert Jakob Rosenberg, the artist combined "brevity with suggestiveness ... the result of sensitive selection, with an emphasis upon significant features and an appeal to the spectator's imagination."
This can certainly be seen in Rembrandt's use of line. After sketching an outline, Rembrandt would go quickly into establishing masses with shading marks. He deftly used a light touch and took advantage of the surface texture of his drawing to create airy cast shadows and halftones.
 | ||
| Old Man Seated in an Armchair, Full Length by Rembrandt, ca. 1631, red and black chalk, 9 x 6¼. Adapted from an article by Joseph C. Skrapits. |
He would also use line to visually connect figure to environment to atmosphere, joining them all in a narrative sense that is quite modern. Old Man Seated in an Armchair shows how the artist's buildup of crosshatched line allowed for subtle layers of shading and a visual merging of everything depicted-the figure's beard blends into his chest, the blanket he is wrapped in blends with his legs, his legs with the chair legs, the chair with the cast shadows behind the figure, and so on.
When it came to drawing shadows and the darkest darks, the marks of the artist are quite vigorous. He put down such heavy shading strokes that the grain of the paper is often undetectable, but the objects never lose their volume because Rembrandt was so skillful at bringing back in the midtones and highlights.
Drawing magazine is a top source for a deep and lasting understanding of drawing past and present. With an emphasis on learning all we can from the Old Masters, like Rembrandt, as well as contemporary draftsmen, Drawing delivers technical demonstrations and meaningful methods with every issue, which is why a subscription to Drawing comes highly recommended. Enjoy!

P.S. For more on Rembrandt's speed-driven draftsmanship, check out our exclusive article, Rembrandt's Shorthand Drawing Style by Joseph C. Skrapits.
----
Shared via my feedly reader
Sent from my iPad
Friday, March 6, 2015
Wednesday, March 4, 2015
Barriers Every Art Student Must Overcome [feedly]
----
Barriers Every Art Student Must Overcome
// Artist's Network
I love being an art instructor, it is such a rewarding career. I'm a self-taught artist and thus have invested many, many hours in the trial-and-error process to learn to create my own satisfying works of art. Those hours pale in comparison to the self-satisfaction of creating art, and equally pale in comparison to the joy I experience when I get to bring students along on the art journey. Sharing my knowledge with students and explaining my processes are some of the most rewarding aspects of my life.
Part of the year I live in Kansas and part of the year I live in Florida. Thus, I teach part of the year in Kansas and part of the year in Florida. It's always bittersweet when I prepare to leave one state to spend time in the other. It's sweet because I look forward to the new classes I have scheduled in the new location, but bitter because I have to say goodbye to current students. It's doubly hard when I see a student on the cusp of an artistic breakthrough. I help students through many struggles and having to leave when they're about to make a breakthrough is hard. As their instructor, my hope is that students diligently practice their art in my absence, forge ahead in their creative path without me, and build their own creative confidence.
Some of my students have come to me for more than 20 years, and since the average time students stay with me is 10 years, I must be doing something right. It's a joy to watch students succeed and I want my art students to continually achieve new levels.
Over the years, I've noticed some barriers students allow to hinder them from reaching their next level of success. I want to get these destructive little habits out in the open so you can avoid doing them. My hope is that if you're aware of these bad habits, you'll be able to catch yourself and STOP!
Barrier 1 - Fear of Failure: Being afraid to fail or to make a mistake is normal when you're learning something new. However, if you don't try something, you will never learn. What's the worse that can happen, anyway? You need a new piece of paper? I have thrown away many things, and with each one tossed, I learned valuable lessons. Fear not, just go for it!
Barrier 2 – Waiting to be Told What To Do: This is also normal when you're a beginner. However, part of learning is trying to figure stuff out on your own. Too many students sit helpless until I get to them, rather than making an attempt. I'm always happy to guide students, but you will become too dependent if you don't learn to analyze your procedures and work through problems. You must push yourself to work independently.
Barrier 3 – Ye Who Practice Not: Once a student has learned a new technique, they often seem to forget it by the following week. It is essential to practice a "segment drawing notebook" as I call it in my books. I see the benefits when a student actually practices. However, many students don't want to, so the level of their artistic growth is not as good as it could be.
Barrier 4 – Acting As a Human Copy Machine: I can see it on the student's face when their art doesn't turn out exactly as they intended. Many art students get way too caught up in making their art identical to their reference. It's important to be an artist and own your artistic liberties. After all, if your reference photo is so great, just frame that! Being an artist is about being creative and a reference photo is just that – a reference.
Barrier 5 – Addiction To Learning Without Applying it to Actual Art: I've had some students that are chronic question askers. Now, that is a good thing, but some get caught up in the learning process, and do nothing but read about it, ask questions, watch the demos, take copious notes, and do nothing more. What they end up with is a notebook full of wonderful advice and suggestions, but they don't draw anything. You must apply the knowledge.
Barrier 6 – Not Paying Attention During Demonstrations: Wow, is this a hotspot for me!  Admittedly, it's frustrating to try to guide an art student and not have him/her pay attention. I have been hard at work showing someone how to improve an area in his artwork, only to turn around and find him off talking to someone else two tables down, checking a text message, etc. I love being an art teacher and will always show art students how to do something better, but you must pay attention in order to learn. Always remember that your teacher is sharing thousands of hours of learning with you, to make it easier for you.
Barrier 7 – Allowing Outside Influences and Opinions Stunt Your Growth: One week the art student is elated with her progress, only to return to class the next week telling me, "He thinks this looks funny" or "They said this needs to be done differently." While I welcome some outside commentary simply due to the fact that art is subjective, it's frustrating when that opinion matters more than mine. I've seen some pieces never finished due to an unkind remark or criticism from an outsider. That is unfortunate. I've seen artwork finished with pride, and then placed under the bed because it wasn't received as well as the student had hoped. I've seen commissioned pieces rejected and my students crushed when the client was dissatisfied. It's all a part of the process, my friends, and you must toughen up. Be proud of your work regardless of outside opinions. If your happiness is hinged on the reaction of others, you will often be hurt. Love what you do and do your best. Please yourself first.
Thank you for allowing me the honor of being your teacher and for helping me fill the world with beautiful art. Together we are an awesome creative team! I hope this blog post explains a few things so we can come together to create a better learning experience. Art students, remember how lucky you are to have a mentor. Keep smiling, and stay creative.
With art, the world is a better place!
Lee
Edited by Meghan Norton, eMedia Production Coordinator, ArtistsNetwork.com
Lee Hammond has been called the Queen of Drawing. That may not be fair these days, since in addition to providing the best drawing lessons, she has also created fantastic books and videos filled with the same easy to follow acrylic painting techniques, colored pencil techniques and more. Click here to see all of the instructional books and DVDs that Lee Hammond has to offer!
The post Barriers Every Art Student Must Overcome appeared first on Artist's Network.
----
Shared via my feedly reader
Sent from my iPad
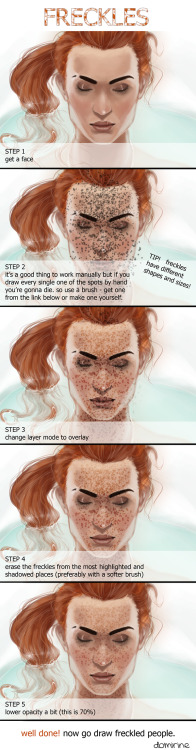
how i do freckles by domirine [feedly]
Sent from my iPad
batsquatchstudios:The big post of things about hands!!!I don’t... [feedly]
----
batsquatchstudios:The big post of things about hands!!!I don't...
// Art and Reference point
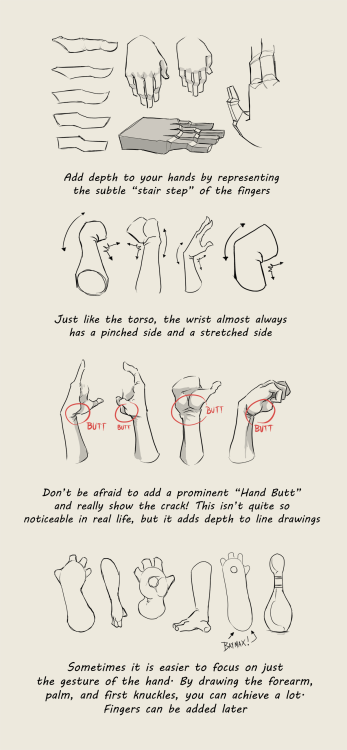
The big post of things about hands!!!
I don't consider myself qualified to teach art at this point in my life, but I don't see any harm in sharing observations I have made. In learning to draw hands over the past few months I've tried to take a lot of notes, with the end goal of hopefully creating a video tutorial one day. I personally learn better from videos than written or illustrated instructions, but I've never found any one video that really demystifies drawing hands.
I believe that in order to tackle such a difficult subject it is important to understand what makes it difficult, and this is not often addressed. If you understand the problems you can systematically solve them…
- Drawing the hand is almost like drawing a whole person. Similar number of "major masses" and a big range of motion.
- Because the hand is so versatile, it's hard to pick a pose when practicing. Most individual body parts are drawn from different angles, whereas the hand must be drawn from different angles and in different poses.
- Hands have a lot of moving parts and from any given angle many of these will be partially or wholly obscured by other parts. Drawing "through the form" results in confusing construction lines that are difficult to interpret.
- Hands are expressive and give big clues as to what a character is doing. Odd or unnatural hand poses detract heavily from your overall piece. Most people avoid drawing hands because of this.
- The thumb flexes along a different plane than the four fingers and sits on its own deviant metacarpal. Drawing the hand in perspective is hard enough, but adding the thumb in relation to the rest of the hand at a convincing angle? Forget about it!
- Hands are typically simplified into box and cylinder forms, but almost every part of the hand is a combination of angles and curves. No one simplified form really describes these parts.
- Hands interact with other objects, like all the time. They're tricky enough to draw on their own… this isn't helping anyone.
- Hands have a lot of bony landmarks, veins, and tendons, all visible at the surface level. These are obstacles when trying to render them realistically.
- Hands are asymmetrical from every angle. Every part, every time.
I think that about covers the major issues we face when trying to draw hands. Now here are some observations and facts that you can use to fight back!
- The width of the first three fingers (index, middle and ring) is the same as the width of the wrist. The pinky and thumb both emanate from the parts of the palm that overhang this line.
- The palm of the hand is more of a pentagon than a rectangle (Thanks, Jim Lee!).
- The length of the middle finger is approximately the same as the length and width of the palm.
- The length of the phalanxes (finger bones in this case) diminishes in size as they get further from the palm. The second (middle) phalanx is 2/3 the length of the first (proximal), and the third (distal) is 2/3 the length of the second. You don't really notice this since the first knuckle is "inside" the palm and we tend to think of the fingers as starting at the "finger crotch".
- The thumb has no middle phalanx, only a proximal and a distal one.
- The thumb is rotated 90 degrees from the angle of the four fingers. So the fingernails point "up" and the thumbnail points "to the side". This obviously changes depending on the pose, but the thumbnail never really points "up" with the other fingernails unless it is bent backwards, as in poses when all five fingers are pressed against a flat surface. It never really points "down" unless the hand is clamping or pinching… or operating a sock puppet.
- The thumb has to sit lower than the palm so that it can flex underneath the hand. The first knuckle of the thumb is almost as far below the index finger as the pinky is far away from the index finger.
- The "webbing" of the thumb connects exactly half way up the palm.
- Hands are asymmetrical from every angle. Every part, every time.
That is all the knowledge I have so far, and now you have it too! I don't think any tutorial, video or otherwise, can ever teach you as much as the thousand observations you will make from drawing a thousand hands. There is no substitute for practice. So practice by looking at your hand from the normal vantage point, and from a mirror. Practice from 3D reference like the Handy Art Tool. Practice by copying other artists and animators whose hands appeal to you. Most of all, practice from imagination.
PRACTICE!
Below is every reference that I can remember that I've personally used while practicing hands:
- http://www.handyarttool.com/
- http://youtu.be/BAQb-5VKxmg
- http://nk-chan.deviantart.com/art/mini-hand-tutorial-68320552
- http://kibbitzer.deviantart.com/art/Hands-Reference-321600866
- http://kibbitzer.deviantart.com/art/Hands-Reference-2-322546252
- http://kibbitzer.deviantart.com/art/Hands-Reference-3-330102275
- http://kibbitzer.deviantart.com/art/Hands-reference-4-428109721
- http://characterdesignnotes.blogspot.com/2010/09/hand-reference.html
- http://characterdesignnotes.blogspot.com/2010/09/hand-reference-part-two.html
- http://characterdesignnotes.blogspot.com/2010/11/hand-reference-part-three.html
Do me a favor and share this around, will you? We could all use more light shed on this subject.
-Aaron
----
Shared via my feedly reader
Sent from my iPad
Crossing Over From Copying to Creating - The Drawing Blog - Blogs - Artist Daily [feedly]
----
Crossing Over From Copying to Creating - The Drawing Blog - Blogs - Artist Daily
http://www.artistdaily.com/blogs/drawing/archive/2015/03/05/make-a-statement-in-figure-drawing.aspx
----
Shared via my feedly reader
Sent from my iPad
Subscribe to:
Comments (Atom)